From a fresh clone to a live teleoperation session. Pick your path — drive the real Axol robot, or the software simulator with no hardware required. Both are driven from the VR headset; the simulator just swaps the motors for a browser visualizer.Documentation Index
Fetch the complete documentation index at: https://docs.almond.bot/llms.txt
Use this file to discover all available pages before exploring further.
- Real Axol robot
- Simulator
Install
Install the package using
uv, then activate the virtual environment so the axol CLI is on your path:Set up CAN (one-time)
Plug in the Axol Hub, then run the one-time CAN setup. This writes udev rules, assigns fixed interface names, and registers a startup script so the interfaces come up automatically on every reboot.After any subsequent replug mid-session (without a reboot), bring the interfaces back up with:
sudo is invoked automatically. You will not need to run this again unless you reinstall the OS or swap the Axol Hub.Verify motors
With the robot powered on and CAN up, read a status snapshot from one motor to confirm communication is working:You should see position, velocity, torque, temperature, and voltage. Any
DISABLED or error status means power or CAN isn’t reaching that motor.Accept the TLS certificate
The VR app connects over a self-signed HTTPS/WSS connection. Before opening the app, you must accept the certificate in the VR headset’s browser — otherwise the WebSocket handshake will be silently rejected.
- Start
axol teleopbriefly (see the next step) — it will print your hostname and IP. - In the VR headset browser, navigate to
https://<hostname>.local:8000orhttps://<local-ip>:8000. - Proceed past the security warning.
- You only need to do this once per machine (the cert is cached in
~/.almond/vr/certs/).
Teleop
teleop CLI reference for the full flag list (stiffness, gripper limits, per-joint gains, config files).
Controller layout
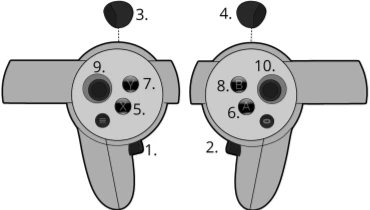
| # | Button | Action |
|---|---|---|
| 1 | Left grip | Press both 1 + 2 to enable arm movement; press either alone to disable |
| 2 | Right grip | Same as above |
| 3 | Left trigger | Actuate left gripper |
| 4 | Right trigger | Actuate right gripper |
| 5 | X | Reset — returns both arms to the rest pose |
| 7 | Y | Exit AR — closes the VR session |
Grip is a toggle, not a hold. Press both grips together to start moving the arms; press either grip on its own to freeze them.
Network tip
If VR tracking feels jittery or arrives in bursts, configure the following on your router or access point:| Setting | Value |
|---|---|
| DTIM interval | 1 |
| Beacon interval | 100 ms |
| WMM APSD (U-APSD) | disabled |
Next steps
Data Collection
Record teleoperation episodes to a LeRobot dataset.
Policy Inference
Run a trained policy autonomously.