Data collection runs across two machines on the same network:Documentation Index
Fetch the complete documentation index at: https://docs.almond.bot/llms.txt
Use this file to discover all available pages before exploring further.
- Main host (the upper computer) — owns the dataset, runs teleop and the recording loop.
- ZED box (the Jetson sender) — streams the three ZED-X One cameras.
Network setup
The two machines must be able to reach each other over the network. Pick the topology that matches your wiring — it determines whether you letaxol assign static IPs or you point it at an existing address.
- Direct ethernet
A single cable between the two NICs, no router in between. Neither machine gets a DHCP address on that link, so
axol assigns static IPs for you: the ZED box takes 192.168.10.1 (via --setup-ip) and the main host takes 192.168.10.2 (via --zed_iface). The receiver’s default zed_host is already 192.168.10.1, so no IP flag is needed on collect-data.eth0, enp3s0, eno1, and so on. Run ip link (or ip addr) on each machine to find the interface carrying the link, and substitute it for <iface> in the commands below.
In both cases PTP runs over whichever interface carries the link (zed.sync-clocks --iface). If the two machines are not on the same L2 segment (e.g. separated by a router rather than a switch), add --transport udpv4 to the clock-sync commands.
Prerequisites
- The
lerobotextra installed on the main host:uv sync --extra lerobot(see Installation). - CAN set up on the main host (
can.setup) and motors verified (motor.info). pyzedinstalled on the ZED box (zed.install) and the three camera serial numbers on hand.- A network link between the two machines — either a direct ethernet cable or a shared router/switch (see Network setup).
ZED box (Jetson)
Open two terminals on the ZED box.Start clock sync (slave)
<iface> with the ZED box’s link interface (find it with ip link). Leave this running for the whole session. See zed.sync-clocks for transport and timestamping options.Stream the cameras
- Direct ethernet
--setup-ip <iface> assigns the sender IP 192.168.10.1/24 to that interface before streaming.Ctrl+C. See zed.stream for resolution, fps, and bitrate flags.Main host (upper computer)
Open two terminals on the main host.Start clock sync (master)
<iface> with the main host’s link interface (find it with ip link). The master role runs on the long-lived upper computer that owns the dataset. Leave it running for the whole session.Run data collection
- Direct ethernet
--zed_iface <iface> assigns the receiver IP 192.168.10.2/24 to that interface; the cameras are reached at the default zed_host 192.168.10.1.collect-data for the full field list, including --fps, --teleop_hz, stiffness, and --push_to_hub, and Command configuration for the draccus override syntax.Controller layout
Episodes are driven entirely from the Quest controllers. The movement controls are the same as in teleoperation; data collection adds the A (record) and B (mode) buttons.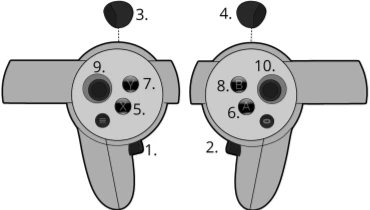
| # | Button | Action |
|---|---|---|
| 1 | Left grip | Press both grips (1 + 2) together to enable arm tracking; press either alone to disable (toggle, not hold) |
| 2 | Right grip | See above |
| 3 | Left trigger | Actuate left gripper |
| 4 | Right trigger | Actuate right gripper |
| 5 | X | Reset to rest pose. During a recording, stops and discards the take (re-record); during the start countdown, cancels it |
| 6 | A | Record: start a take (3-second countdown), or stop and save the current take |
| 7 | Y | Exit the VR session |
| 8 | B | Toggle between Teleop and Data Collection mode (disabled while recording or counting down) |
Recording an episode
Enter Data Collection mode
Press B to switch from Teleop into Data Collection. You can drive the arms in either mode, but a take can only be started from Data Collection.
Start a take
Press A to begin recording — a 3-second countdown runs (the headset stays in Data Collection), then frame capture begins. Press A again during the countdown, or X, to cancel.
Finish the take
- Press A to stop and save the episode.
- Press X to stop and discard it (re-record).
| Headset state | Meaning |
|---|---|
Teleop | Driving the arms; recording not armed |
Data Collection | Driving the arms; ready to record |
Recording | Capturing frames to the dataset |
Saving | Episode being written to disk; controls blocked |
--root; an aborted session that saved no episodes is cleaned up on shutdown. Press Ctrl+C in the collect-data terminal to finish.
The full controller bindings and headset state machine are maintained in the axol-vr interface repo.
Next steps
Policy Inference
Run a trained policy autonomously across the same two machines.
collect-data reference
Every flag and the dataset capture internals.