
axol collect-data.
- Axol records joint positions by default. Turn on Observe Cartesian to record gripper poses instead.
- Mantis records gripper poses from Quest, Lighthouse or Ultimate tracking.
Before you start
- Install Axol with the one-command install and connect the device you selected.
- For Axol, connect the robot.
- For Mantis, finish its hardware and pose source setup. Mantis settings → Tracking must show setup complete, with an approved tracker-to-gripper transform for both sides.
- Connect at least one ZED camera over GMSL. Assign it to a slot with Record turned on.
- Axol uses the overhead, left arm and right arm slots.
- Mantis uses separate Head, Left Mantis and Right Mantis slots.
- Both can record the stereo head camera and both wrist cameras together.
- For Axol, and for Mantis with the Quest source, have a Meta Quest with the TLS certificate authorized. Mantis with Lighthouse or Ultimate needs no headset.
Run it
- Axol
- Mantis
1
Connect the robot and assign cameras
Connect the Axol Host and, with Axol selected, the robot. Open Axol settings → Cameras and assign each camera to the overhead, left arm or right arm slot. Turn on Record for at least one. Axol detects stereo ZED X cameras automatically. See Cameras.
2
Select Collect data and fill in the fields
Pick Collect data and fill in:
- Repo ID: type a new name such as
myorg/pick-place, or pick an existing dataset from the list to add to it. The list shows each dataset’s episode count. - Task: a description of the task.
3
Start and record from the headset
Press Start, connect the headset and drive the arms. Record with the controllers, as described in Recording an episode. The panel shows the camera feeds and episode state, and has buttons for the same actions. See Driving from the panel.
--robot_config.cameras "{overhead: {serial: 41234567}}" records the overhead camera only.The cameras value is one inline YAML dictionary. See Command configuration.Axol detects stereo ZED X cameras from their serial number:- A stereo overhead camera records both eyes, as
overhead_leftandoverhead_right. - A stereo wrist camera records its left eye under the slot name, like a mono camera.
stereo: true and choose the eyes:eyes: bothrecordsX_leftandX_right.eyes: leftoreyes: rightrecords one eye under the slot nameX. A forced stereo wrist camera needseyes: leftto stay single-eye.
Ctrl+C to finish. See collect-data for every field, including --fps, --teleop_hz, stiffness and --push_to_hub.Quest controller layout
With Axol, and with Mantis on the Quest source, you record from the Quest controllers. The arm controls are the same as in teleoperation. Data collection adds the A button for recording. The control panel can take the same actions. See Driving from the panel.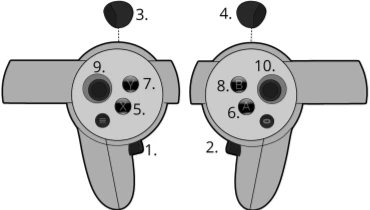
The camera feeds are shown in the headset, so you can line up takes from the robot’s view.
Recording an episode
1
Drive to the start pose
Put on the headset, engage tracking and drive the arms to where the take should begin.
2
Start a take
Press A. Recording starts after a 3-second countdown. Press A again or X to cancel the countdown.
3
End the take
The first press asks for confirmation in the headset, so a stray press never loses a take.
- Press A for Save episode? Press A again to save, or X to keep recording.
- Press X for Discard episode? Press X again to discard and re-record, or A to keep recording.
4
Let the arms return to rest
After each take, the arms return to the rest pose on their own. The move is guarded: if an arm meets resistance, such as a gripper caught on a handle or a person, the move stops.
- The arms go limp in a gravity-compensation hold. The episode keeps saving.
- Guide the arms clear by hand.
- Press X to plan a new return from where they are.
If
--root already holds the dataset, collection adds to it. If you stop a new session before saving any episode, Axol deletes the empty dataset.
Contact stops
Every return to rest is guarded, including the X reset and the first move at startup. Set the sensitivity with Return-to-rest contact stop in Axol settings → Robot (--teleop_config.vr_teleop_config.reset_torque_threshold). Raise it if normal returns stop for no reason. Set 0 to turn it off.
You can also stop the arms when they push hard during a take. This check is off by default, because recording often pushes on the scene on purpose. Set Teleop contact stop in Axol settings → Robot (--teleop_config.vr_teleop_config.teleop_torque_threshold). The panel suggests 16 Nm.
When it trips, tracking disengages, the take is discarded and the arms go limp. Guide them clear, then press X and record again. Teleoperation uses the same settings.
These stops apply to Axol’s arms. Mantis has no arms to return home. Each Mantis take starts with the source’s start gesture, and the grippers are off between takes.
Driving from the panel
When you start from the control panel, it also works as an operator display. It shows the camera feeds the headset receives, with a full-screen option. The Episode control box shows the phase, the episode number and the saved count, with these buttons:- Start recording starts the same 3-second countdown as the headset. Click it again to cancel.
- Save episode and Discard episode ask you to click again to confirm.
- Return to rest appears during a contact hold. It does the same as X.
- the Mantis quality check rejects it,
- a camera fails during capture,
- it ends before its first frame is recorded, or
- the recorder refuses it at save.
Saved data
- Each episode is on disk as soon as it is saved. If the recorder stops unexpectedly, you lose at most the take being written.
- Resuming checks the dataset. If the saved episodes have a gap, Axol keeps the complete episodes before the gap, removes the rest and continues from there. If no complete episode is left, it asks you to delete the dataset.
- Takes with dropped video frames are discarded. If the camera encoder drops frames under heavy load, the video doesn’t match the recorded rows. Axol discards that take and logs why. The session keeps running, so record the take again.
Mix Axol and Mantis episodes
Axol and Mantis episodes can go in one dataset. For each Axol run:- Turn on Observe Cartesian, so the recorded state and actions match Mantis.
- Keep the gripper setting, camera slots, image resolution and recording rate the same as the Mantis runs.
observation.pose_lag column, which Axol fills in automatically. A dataset started on Axol without that column keeps its layout, and Mantis leaves the column out.
Next steps
Config Parameters
Every setting for data collection, with its default.
Run Policy
Run a trained policy on the same computer.
collect-data reference
Every flag for data collection.