> ## Documentation Index
> Fetch the complete documentation index at: https://docs.almond.bot/llms.txt
> Use this file to discover all available pages before exploring further.
# Teleoperation
> Drive Axol live from a VR headset — from the web control panel or the CLI, on real hardware or in sim.
Teleoperation drives the robot live from a Meta Quest headset: the headset streams your hand and elbow pose to the SDK, which solves IK and commands the arms. You can run it two ways — from the **web control panel** (browser) or the **CLI** (`axol teleop`) — and against either the **real robot** or the **software simulator** (no hardware needed; the sim just swaps the motors for a browser visualizer).
## Before you start
* **Axol installed** — the [one-command install](/installation) on the robot machine, or a [development install](/advanced/development-install) for sim.
* **CAN up and motors verified** (real robot only). The control panel does this for you on connect; on the CLI run [`axol can.setup`](/cli/can-setup) once, then check a motor with [`axol motor.info`](/cli/motor-info).
* **A Meta Quest** on the same network, with the [TLS certificate authorized](#authorize-the-tls-certificate) once.
No CAN setup or motor check is needed in **sim** — there's no hardware to talk to.
## Authorize the TLS certificate
The VR app connects over a self-signed HTTPS/WSS link, so its certificate needs a one-time approval in the headset browser — otherwise the WebSocket handshake is silently rejected.
The easiest way is from the app itself: when you press **Connect** and the certificate hasn't been approved yet, the connection fails and an **Authorize certificate** button appears. Tap it, proceed past the warning in the popup, and the app reconnects automatically. You only need to do this once per headset (the cert is cached in `~/.almond/vr/certs/` on the host). To approve it manually instead, open `https://.local:8000` or `https://:8000` in the headset browser and proceed past the warning.
## Run it
Open the control panel and connect the **Axol Host** — the panel then brings up the robot automatically (running `can.setup` the first time); if the **Axol** tile isn't green, press **Connect** on it. For **sim**, you can skip the robot connection. See the [Web Control Panel guide](/guides/control-panel#connections) for the connect flow.
To see the robot's camera feeds in the headset, open the **Cameras** settings tab and assign the ZED cameras to their slots. Skip this for camera-free teleop. See [Cameras](/guides/control-panel#cameras).
Pick **Teleoperation** from the operation selector. Toggle **sim** to drive the browser visualizer with no hardware. Press **Start**. The panel begins streaming and is ready for the headset to connect.
Put on the Quest, open the VR app at [axol.almond.bot](https://axol.almond.bot), enter the host's address, and press **Connect** — then **Start** to enter the session.
On the robot machine:
```bash theme={null}
axol teleop
```
For **sim**, add `--sim` — this opens a browser visualizer at [http://localhost:8002](http://localhost:8002) and runs the same VR server on port 8000, so you can drive the simulated robot from the headset exactly like the real one (great for verifying network and tracking before powering the robot):
```bash theme={null}
axol teleop --sim
```
The terminal prints the hostname and IP. Open the VR app at [axol.almond.bot](https://axol.almond.bot) on the headset, enter either address, and press **Connect**, then **Start**.
Have ZED cameras attached? Pass `--cameras "{overhead: 41234567, left_arm: 41234568, right_arm: 41234569}"` to relay the overhead and wrist feeds into the headset — all shown at once, each movable and resizable with the controllers. See [Camera views](/guides/vr-interface#camera-views).
See the [`teleop`](/cli/teleop) reference for the full flag list (stiffness, gripper limits, per-joint gains, config files).
## Controller layout
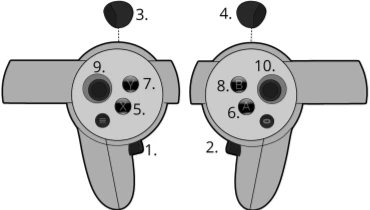 | # | Button | Action |
| - | ------------- | ------------------------------------------------------------------------------ |
| 1 | Left grip | Press both 1 + 2 to **enable** arm movement; press either alone to **disable** |
| 2 | Right grip | Same as above |
| 3 | Left trigger | Actuate left gripper |
| 4 | Right trigger | Actuate right gripper |
| 5 | X | **Reset** — returns both arms to the rest pose |
| 7 | Y | **Exit AR** — closes the VR session |
Grip is a toggle, not a hold. Press both grips together to start moving the arms; press either grip on its own to freeze them.
## Network tip
If VR tracking feels jittery or arrives in bursts, configure the following on your router or access point:
| Setting | Value |
| ----------------- | -------- |
| DTIM interval | `1` |
| Beacon interval | `100` ms |
| WMM APSD (U-APSD) | disabled |
These prevent the AP from batching packets between beacon intervals, which causes intermittent latency spikes that are especially noticeable in VR.
## Next steps
Drive the robot over the internet from anywhere with Tailscale.
Record teleoperation episodes to a LeRobot dataset.
| # | Button | Action |
| - | ------------- | ------------------------------------------------------------------------------ |
| 1 | Left grip | Press both 1 + 2 to **enable** arm movement; press either alone to **disable** |
| 2 | Right grip | Same as above |
| 3 | Left trigger | Actuate left gripper |
| 4 | Right trigger | Actuate right gripper |
| 5 | X | **Reset** — returns both arms to the rest pose |
| 7 | Y | **Exit AR** — closes the VR session |
Grip is a toggle, not a hold. Press both grips together to start moving the arms; press either grip on its own to freeze them.
## Network tip
If VR tracking feels jittery or arrives in bursts, configure the following on your router or access point:
| Setting | Value |
| ----------------- | -------- |
| DTIM interval | `1` |
| Beacon interval | `100` ms |
| WMM APSD (U-APSD) | disabled |
These prevent the AP from batching packets between beacon intervals, which causes intermittent latency spikes that are especially noticeable in VR.
## Next steps
Drive the robot over the internet from anywhere with Tailscale.
Record teleoperation episodes to a LeRobot dataset.