> ## Documentation Index
> Fetch the complete documentation index at: https://docs.almond.bot/llms.txt
> Use this file to discover all available pages before exploring further.
# Data Collection
> Record VR teleoperation episodes to a LeRobot dataset — from the web control panel or the CLI.
Data collection records teleoperation episodes — joint trajectories plus synchronized camera frames — into a [LeRobot](/api/lerobot) dataset you can later train on. Everything runs on **one machine**: the computer wired to the robot with the ZED cameras attached (typically a ZED Box / Jetson). Because it owns the dataset, runs teleop, and captures the cameras locally, every recorded frame and joint sample shares the same clock — no time sync to set up.
You drive the arms over VR exactly as in [teleoperation](/operations/teleop); the session runs in **data collection** mode, where the **A** (record) controller button starts and saves takes. You can launch it from the **web control panel** or the **CLI** (`axol collect-data`).
## Before you start
* **Axol installed** ([one-command install](/installation)), CAN up, and motors verified.
* **At least one ZED camera connected** over GMSL (up to three: overhead / left arm / right arm), with their serial numbers on hand. (Camera serials are printed on the camera body, or read them from the Cameras settings tab / Python — see the tip below.)
* **The VR TLS certificate authorized** once — see [Teleoperation](/operations/teleop#authorize-the-tls-certificate).
List the connected cameras and their serials from Python:
```bash theme={null}
python -c "from almond_axol.zed import list_zed_devices; print(list_zed_devices())"
```
If a camera was plugged in after boot and doesn't show up, restart the ZED X daemon (`sudo systemctl restart zed_x_daemon`), or press **Restart daemon** in the control panel's Cameras settings tab.
## Run it
Connect the **Axol Host** and **Axol**, then open the **Cameras** settings tab and assign each detected camera to its slot (overhead / left arm / right arm) — at least one is required. Stereo ZED X cameras are detected automatically. See [Cameras](/guides/control-panel#cameras).
Pick **Collect Data**. Set the dataset **repo id** (e.g. `myorg/pick-place`) and the **task** description — the only per-run inputs. Everything reusable (fps, teleop rate, stiffness, push-to-hub) lives in the [Settings](/guides/control-panel#settings) tabs.
Press **Start**, connect the headset, and drive the arms. Recording is controlled entirely from the VR controllers — see [Recording an episode](#recording-an-episode) below.
**Collect Data has no on-screen episode buttons** — takes are driven from the VR controller (**A** to record/save, **X** to discard). The session is locked to data collection; there's no mode toggle.
On the robot machine:
```bash theme={null}
axol collect-data \
--repo_id myorg/pick-place \
--task "Pick the red cube and place it in the bin" \
--robot_config.cameras "{overhead: {serial: 41234567}, left_arm: {serial: 41234568}, right_arm: {serial: 41234569}}"
```
Replace the serials with your cameras'. Assign only the slots you have — at least one is required, and any you omit are simply not recorded (e.g. `--robot_config.cameras "{overhead: {serial: 41234567}}"` records the overhead alone). The `cameras` dict is one inline YAML value (see [Command configuration](/cli/configuration#field-name-conventions)). Stereo ZED X cameras are detected from their serial automatically: a stereo **overhead** records both eyes as `overhead_left` / `overhead_right`, while a stereo **wrist** records its left eye under the plain slot name (like a mono camera). To override the auto-detection, set `stereo: true` together with the eye policy you want — `eyes: both` records `X_left` / `X_right`, `eyes: left` (or `right`) records a single eye under the plain name `X` (so a forced wrist needs `eyes: left` to stay single-eye). For example, to force the overhead:
```bash theme={null}
--robot_config.cameras "{overhead: {serial: 41234567, stereo: true}, left_arm: {serial: 41234568}, right_arm: {serial: 41234569}}"
```
Connect the headset and record from the controllers — see [Recording an episode](#recording-an-episode). Press `Ctrl+C` to finish. See [`collect-data`](/cli/collect-data) for the full field list (`--fps`, `--teleop_hz`, stiffness, `--push_to_hub`) and [Command configuration](/cli/configuration) for the override syntax.
## Controller layout
Episodes are driven entirely from the Quest controllers. The movement controls are the same as in [teleoperation](/operations/teleop); data collection adds the **A** (record) button. The session is locked to data collection mode, so there's no mode toggle to worry about.
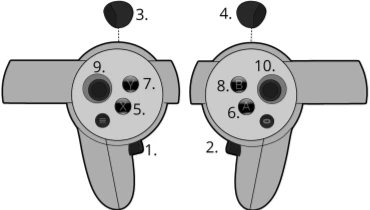 | # | Button | Action |
| - | ------------------------ | ------------------------------------------------------------------------------------------------------------------------------------------------------------------------------------------------------------------ |
| 1 | Left grip | Press both grips (1 + 2) together to **enable** arm tracking; press either alone to **disable** (toggle, not hold) |
| 2 | Right grip | See above |
| 3 | Left trigger | Actuate left gripper. While tracking is disengaged: point at a camera screen and hold to **move** it (both triggers on one screen **resize** it) |
| 4 | Right trigger | Actuate right gripper. While tracking is disengaged: point at a camera screen and hold to **move** it (both triggers on one screen **resize** it) |
| 5 | X | **Reset** to rest pose; during the start countdown, cancels it. During a recording, arms the **Discard episode?** confirmation — press **X** again to discard and re-record, or **A** to cancel and keep recording |
| 6 | A | **Record**: start a take (3-second countdown). During a recording, arms the **Save episode?** confirmation — press **A** again to save, or **X** to cancel and keep recording |
| 7 | Y | **Exit** the VR session |
| — | Right thumbstick (click) | **Reset the camera screens** — re-anchor to the current gaze and clear moves + resizes; see [Camera views](/guides/vr-interface#camera-views) |
The camera feeds are relayed to the headset during collection, so you can line up takes from the robot's point of view.
## Recording an episode
The session is already in **Data Collection** — put on the headset, engage tracking, and drive the arms to where you want the take to begin.
Press **A** to begin recording — a 3-second countdown runs, then frame capture begins. Press **A** again during the countdown, or **X**, to cancel.
Stopping is **confirmation-gated** — the first press arms an in-headset popup instead of stopping immediately, so a fumbled button never loses a take:
* Press **A** to arm **Save episode?** — press **A** again to save, or **X** to cancel and keep recording.
* Press **X** to arm **Discard episode?** — press **X** again to discard and re-record, or **A** to cancel and keep recording.
Nothing is committed until you confirm. After you confirm a **save**, the headset enters the **Saving** state and every control except **Y** (exit) is blocked while the episode is written to disk; when the write completes the headset returns to Data Collection and the arms move back to the rest pose, ready for the next take. Confirming a **discard** drops the take and rewinds to re-record it.
The HUD shows an **Episode N** readout (top-right) with the 1-based number of the episode you're about to record, so you always know where you are in the dataset.
| Headset state | Meaning |
| ----------------- | ----------------------------------------------- |
| `Data Collection` | Driving the arms; ready to record |
| `Recording` | Capturing frames to the dataset |
| `Saving` | Episode being written to disk; controls blocked |
Collection resumes from an existing dataset at `--root`; an aborted session that saved no episodes is cleaned up on shutdown.
**Saved takes are integrity-checked.** If the camera encoder drops frames during a take (a feed-queue overflow under heavy load), the video no longer lines up with its recorded rows — so that episode is **discarded instead of saved**, with an error explaining why (in the CLI output / control panel log console). Re-record it rather than adding a misaligned episode to the dataset.
The full controller bindings and headset state machine are documented in the [VR Interface](/guides/vr-interface) guide.
## Next steps
Run a trained policy autonomously on the same machine.
Every flag and the dataset capture internals.
| # | Button | Action |
| - | ------------------------ | ------------------------------------------------------------------------------------------------------------------------------------------------------------------------------------------------------------------ |
| 1 | Left grip | Press both grips (1 + 2) together to **enable** arm tracking; press either alone to **disable** (toggle, not hold) |
| 2 | Right grip | See above |
| 3 | Left trigger | Actuate left gripper. While tracking is disengaged: point at a camera screen and hold to **move** it (both triggers on one screen **resize** it) |
| 4 | Right trigger | Actuate right gripper. While tracking is disengaged: point at a camera screen and hold to **move** it (both triggers on one screen **resize** it) |
| 5 | X | **Reset** to rest pose; during the start countdown, cancels it. During a recording, arms the **Discard episode?** confirmation — press **X** again to discard and re-record, or **A** to cancel and keep recording |
| 6 | A | **Record**: start a take (3-second countdown). During a recording, arms the **Save episode?** confirmation — press **A** again to save, or **X** to cancel and keep recording |
| 7 | Y | **Exit** the VR session |
| — | Right thumbstick (click) | **Reset the camera screens** — re-anchor to the current gaze and clear moves + resizes; see [Camera views](/guides/vr-interface#camera-views) |
The camera feeds are relayed to the headset during collection, so you can line up takes from the robot's point of view.
## Recording an episode
The session is already in **Data Collection** — put on the headset, engage tracking, and drive the arms to where you want the take to begin.
Press **A** to begin recording — a 3-second countdown runs, then frame capture begins. Press **A** again during the countdown, or **X**, to cancel.
Stopping is **confirmation-gated** — the first press arms an in-headset popup instead of stopping immediately, so a fumbled button never loses a take:
* Press **A** to arm **Save episode?** — press **A** again to save, or **X** to cancel and keep recording.
* Press **X** to arm **Discard episode?** — press **X** again to discard and re-record, or **A** to cancel and keep recording.
Nothing is committed until you confirm. After you confirm a **save**, the headset enters the **Saving** state and every control except **Y** (exit) is blocked while the episode is written to disk; when the write completes the headset returns to Data Collection and the arms move back to the rest pose, ready for the next take. Confirming a **discard** drops the take and rewinds to re-record it.
The HUD shows an **Episode N** readout (top-right) with the 1-based number of the episode you're about to record, so you always know where you are in the dataset.
| Headset state | Meaning |
| ----------------- | ----------------------------------------------- |
| `Data Collection` | Driving the arms; ready to record |
| `Recording` | Capturing frames to the dataset |
| `Saving` | Episode being written to disk; controls blocked |
Collection resumes from an existing dataset at `--root`; an aborted session that saved no episodes is cleaned up on shutdown.
**Saved takes are integrity-checked.** If the camera encoder drops frames during a take (a feed-queue overflow under heavy load), the video no longer lines up with its recorded rows — so that episode is **discarded instead of saved**, with an error explaining why (in the CLI output / control panel log console). Re-record it rather than adding a misaligned episode to the dataset.
The full controller bindings and headset state machine are documented in the [VR Interface](/guides/vr-interface) guide.
## Next steps
Run a trained policy autonomously on the same machine.
Every flag and the dataset capture internals.